Getting Started
Links to Sections:
Creating a New Project
If you are starting a new project from scratch, we recommend using the GeoBlazor Templates to create a new Blazor application with GeoBlazor already installed. This will save you time and ensure that your project is set up correctly with all the necessary dependencies and configurations.
GeoBlazor Registration
- Visit licensing.dymaptic.com. Click on the
Sign Upbutton.
- Fill out the registration form and click
Register. You will receive an email with a confirmation link. Click the link in the email to confirm your registration.
- Return to licensing.dymaptic.com and log in with your new account.

- Click on the
Get Licensesbutton.
- Click on the
Get a Free Keybutton to get a free GeoBlazor Core Registration key, or click on theGet GeoBlazor Probutton to purchase a GeoBlazor Pro license key with additional features and support.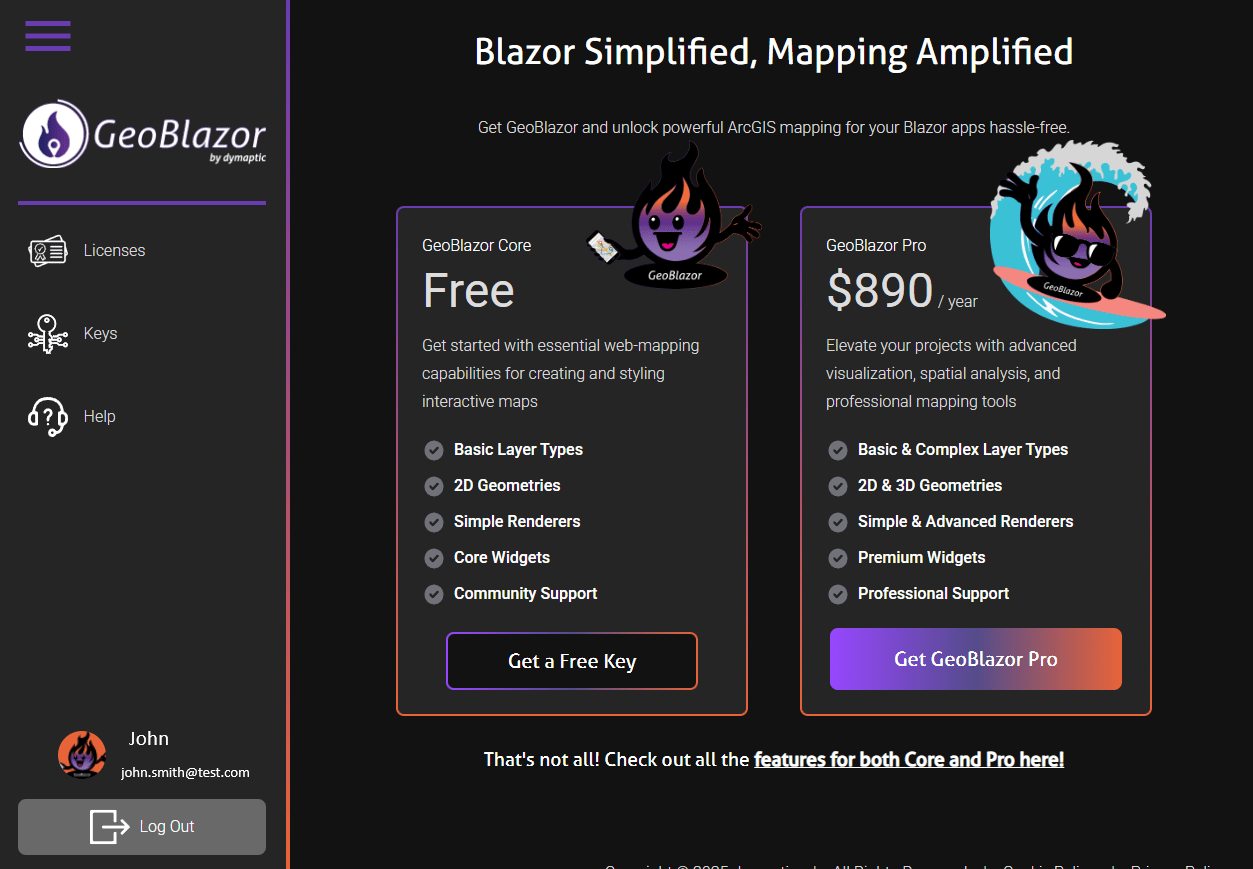
- Click on the
Generate New API Keybutton to generate a new license key.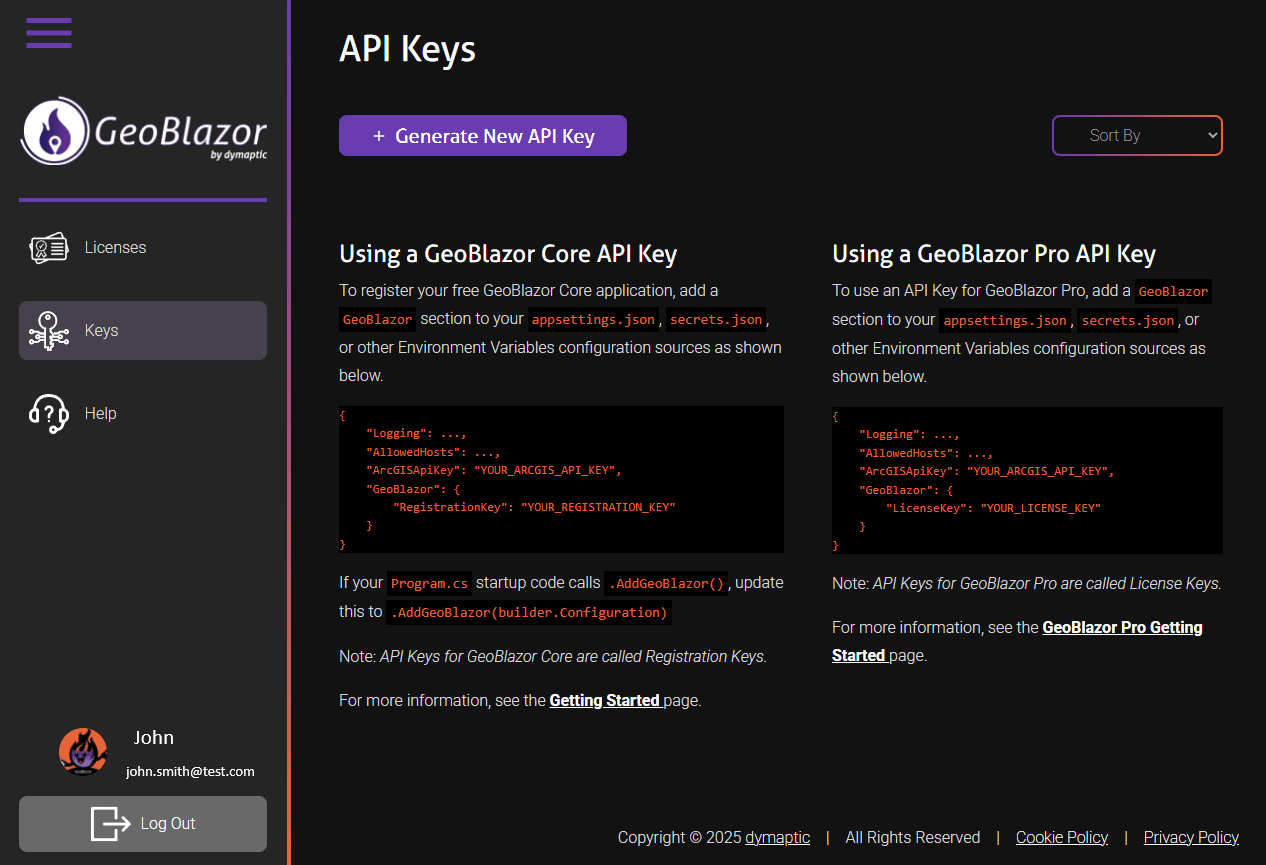
- Give your key a name, and select
GeoBlazor Core(the free version) orGeoBlazor Proin theSoftwaredropdown. ClickSubmit.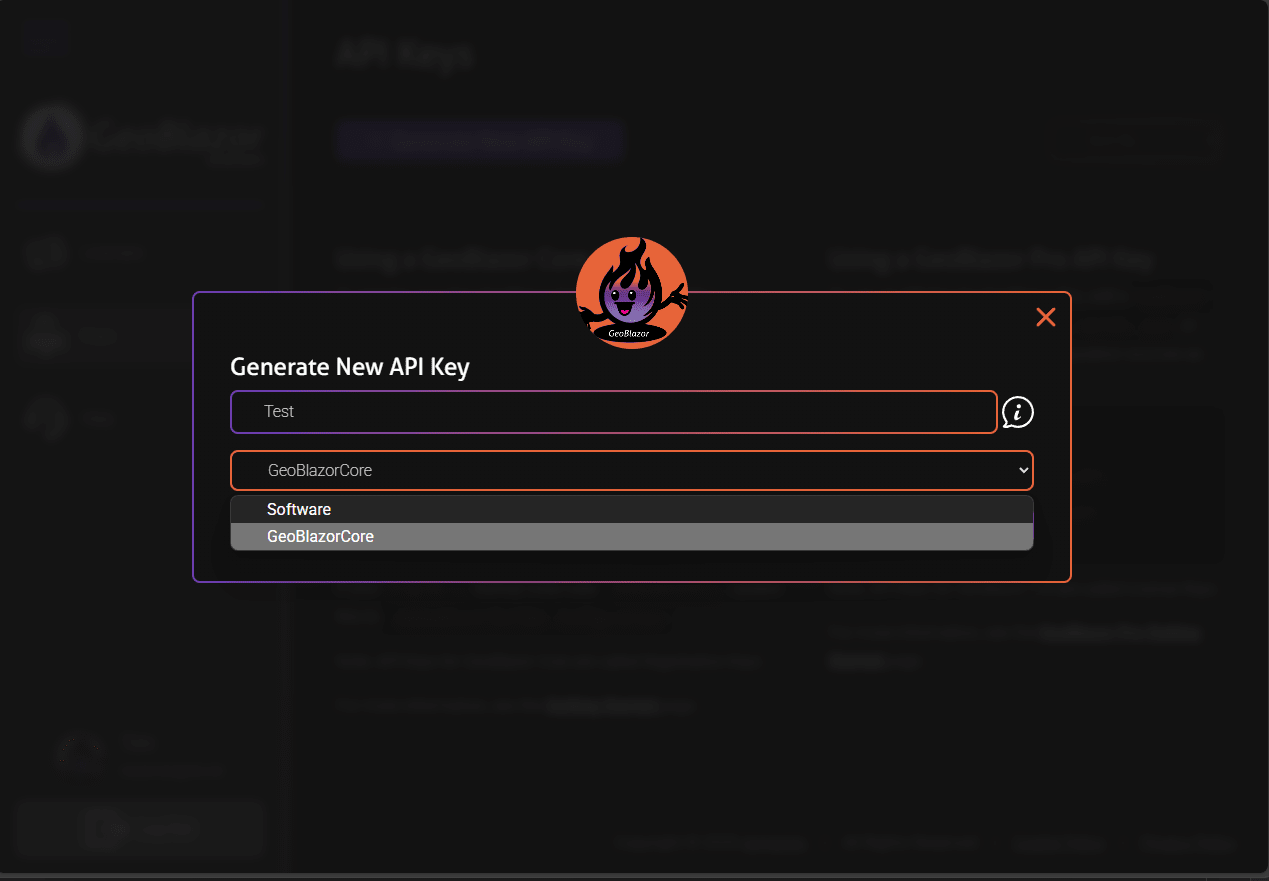
- You should see your new key shown on the page. Click the
Copy Keybutton to copy the key to your clipboard.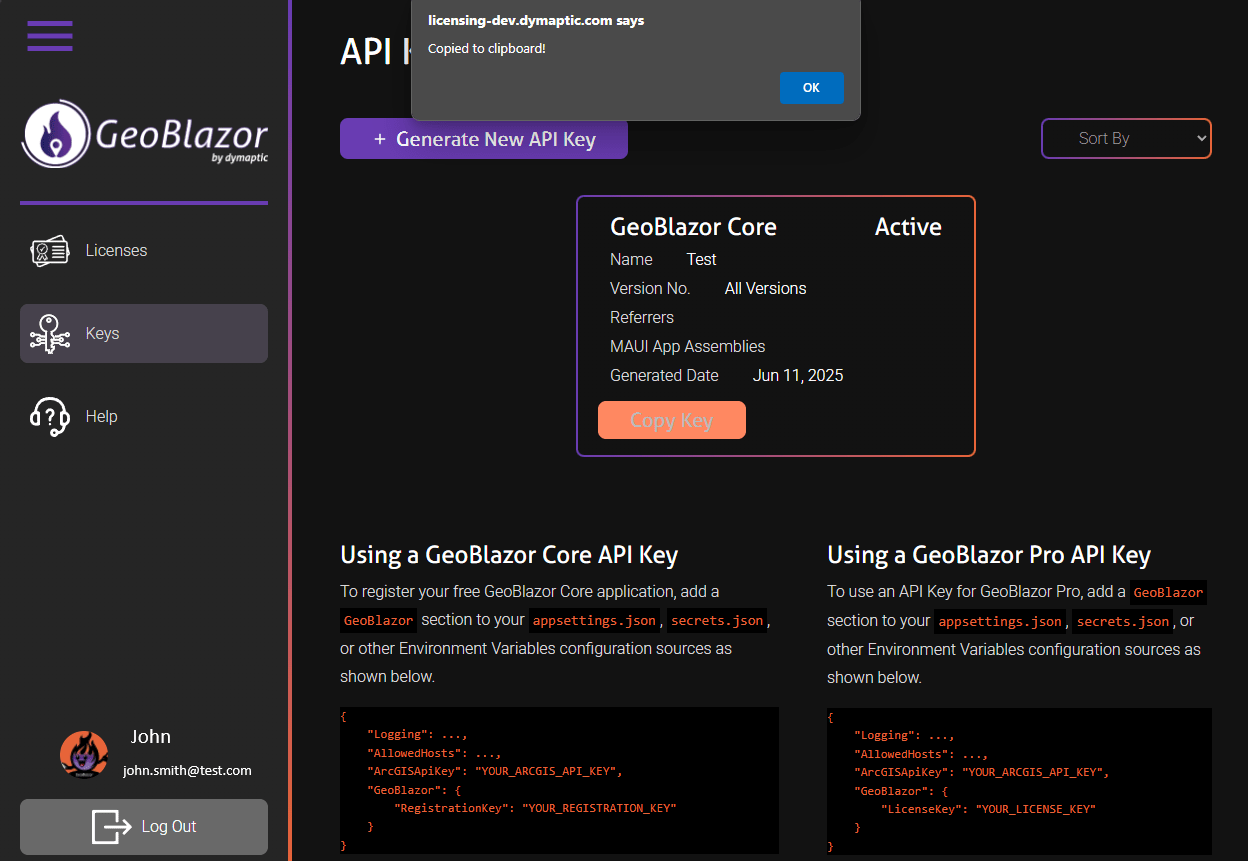
-
This key must be stored where your application can access it as part of the .NET
IConfigurationenvironment variables. You can add the key to theappsettings.jsonfile, the user secretsecrets.jsonfile, or an environment-specific file likeappsettings.Development.jsonorappsettings.Production.json. Learn more about configuration files in .NETNote: Older versions of the documentation referenced “RegistrationKey” instead of “LicenseKey” for GeoBlazor Core. We have made the two terms interchangeable, so you can use either in your configuration files.
{ "GeoBlazor" : { "LicenseKey": "your-GeoBlazor-license-key" } } -
If your application is running in
InteractiveServermode, then the configuration file needs to be available to the server application. If it is running inInteractiveWebAssembly, it needs to be available to the client application. If you are usingInteractiveAutoor a combination of render modes on different pages, or you’re just not sure, then you should add configuration settings to both the server and client applications. Be aware that WebAssembly projects do not support user secrets, and do not by default see appsettings files in the root folder, so you need to place the files inside thewwwrootfolder for them to be accessible by the client application. If you need to use anappsettingsfile, but don’t want to commit your API keys to the repository, you can add the file to the.gitignore, delete it, make a commit, then re-add it. Git will ignore the file after that. A typical Blazor Web App project structure would look like this:MyBlazorApp/ ├── MyBlazorApp/ │ ├── appsettings.json │ ├── appsettings.Development.json // use for local server development, or use secrets.json │ └── appsettings.Production.json // not really necessary, most production server env have their own configuration settings ├── MyBlazorApp.Client/ │ ├── wwwroot/ │ │ ├── appsettings.json │ │ ├── appsettings.Development.json // use for local wasm development │ │ ├── appsettings.Production.json // use for production wasm, you do have to deploy keys to production for WebAssembly


ArcGIS Authentication
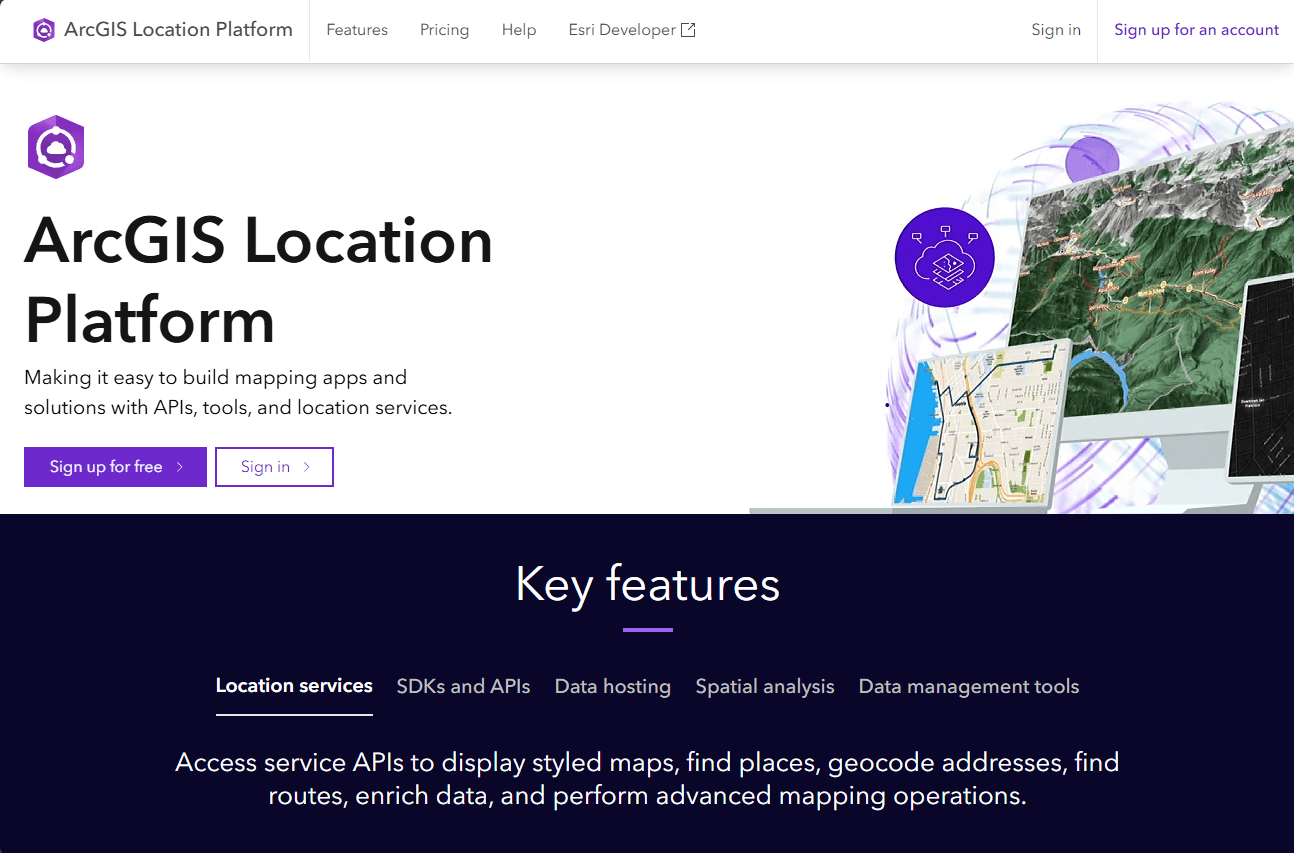
- Visit location.arcgis.com. Click Sign up for free to create an account. For existing ArcGIS Online or ArcGIS Enterprise users, see the instructions here.
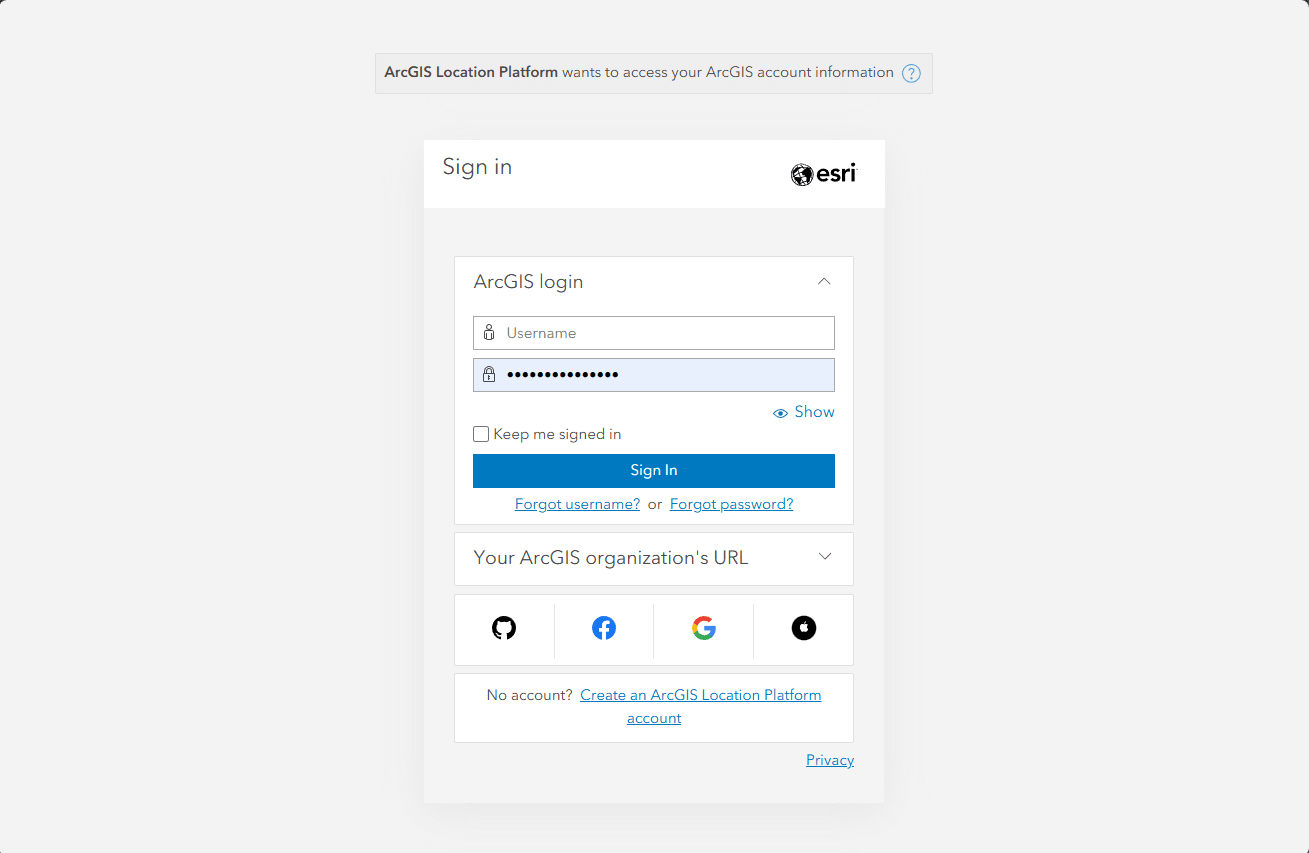
- Once registered, choose Sign In.
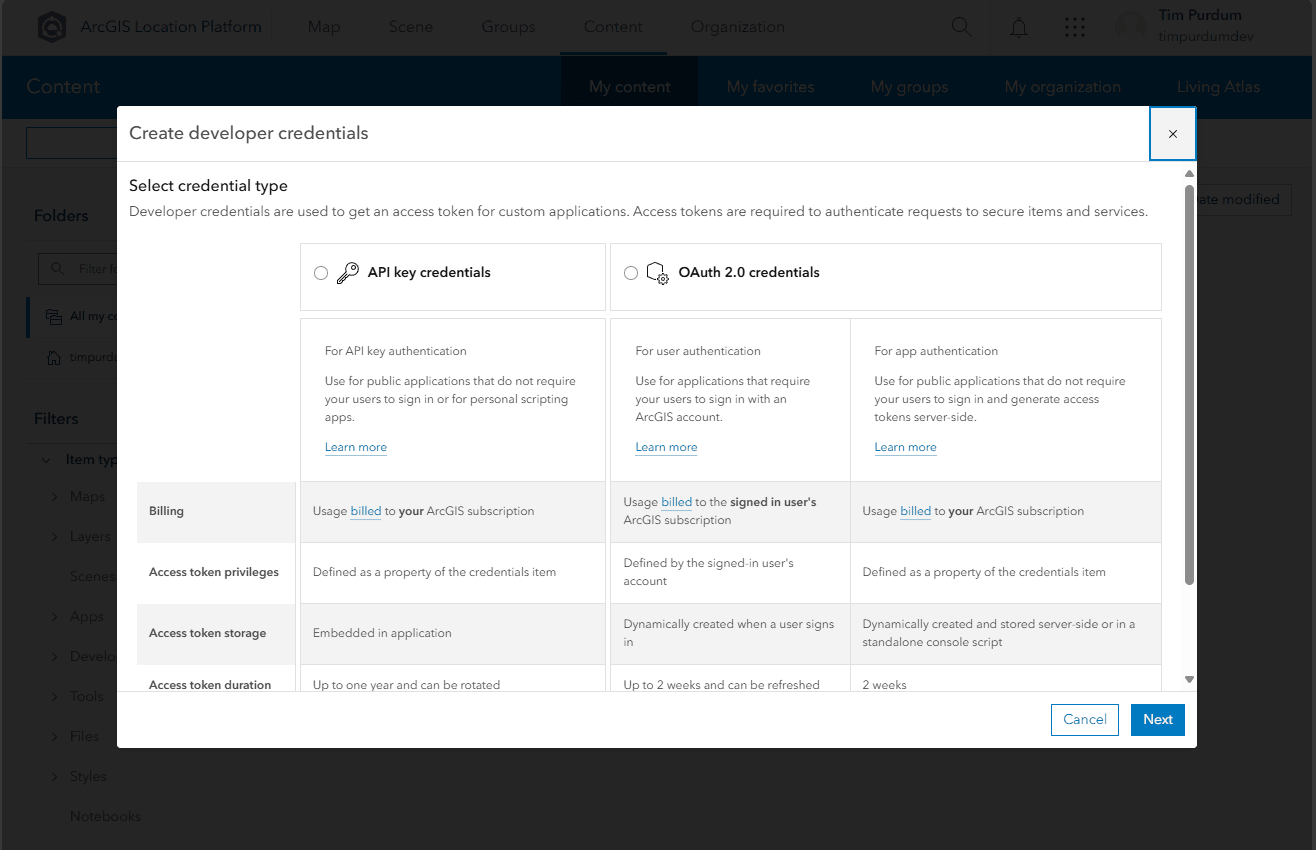
- This is the Location Platform Dashboard, where you can manage your API keys, applications, and billing. Click on
Create developer credentialson the right side to get started.
- You can create an API Key or an OAuth Application. For the simplest approach, choose API key credentials. Directions for OAuth 2.0 credentials are here.
- Set an expiration date for your API key, up to one year in the future. Add referrers if you want to ensure that your key can only be used from your website or application. Click
Nextwhen done.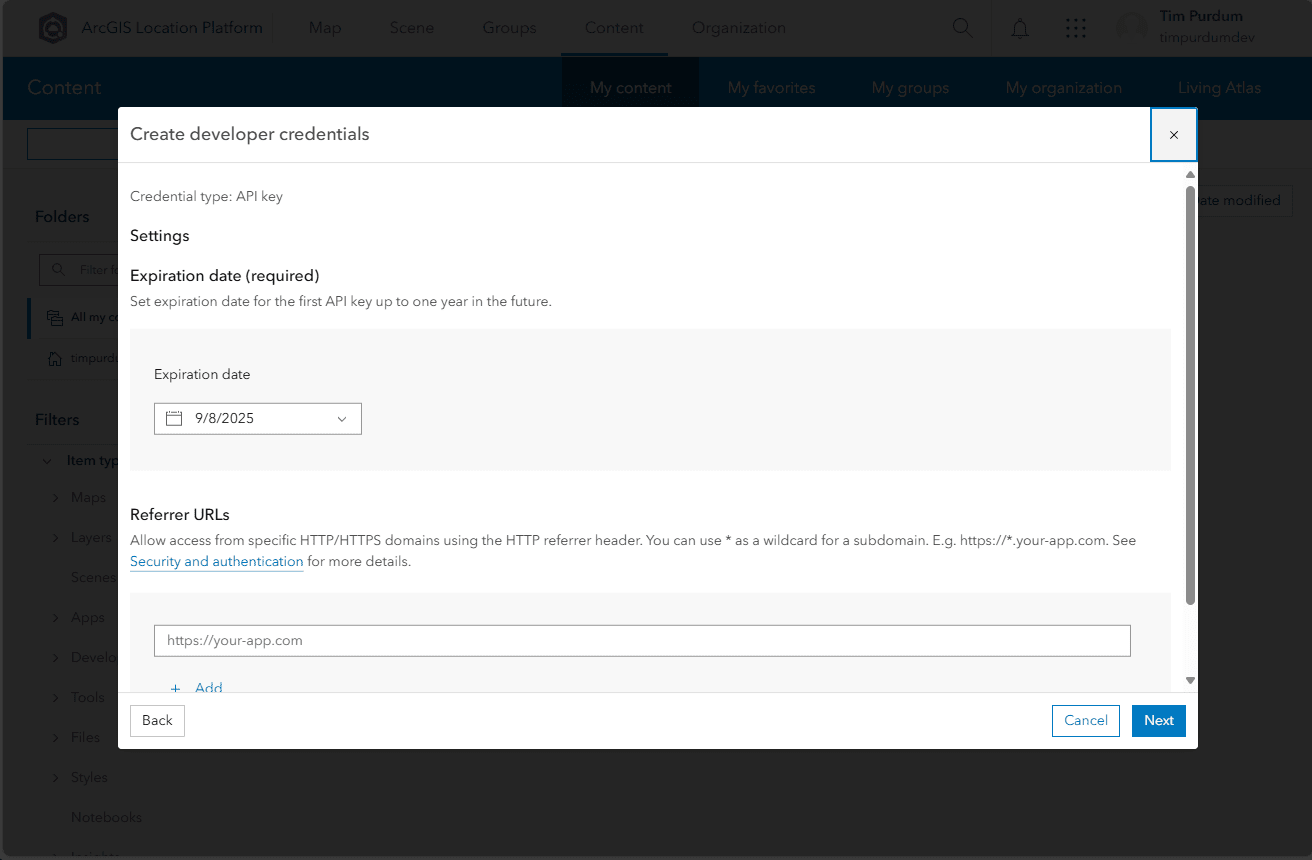
- Choose which ArcGIS services you want to enable for your API key. You should at minimum enable the
Basemapsservices. ClickNextwhen done.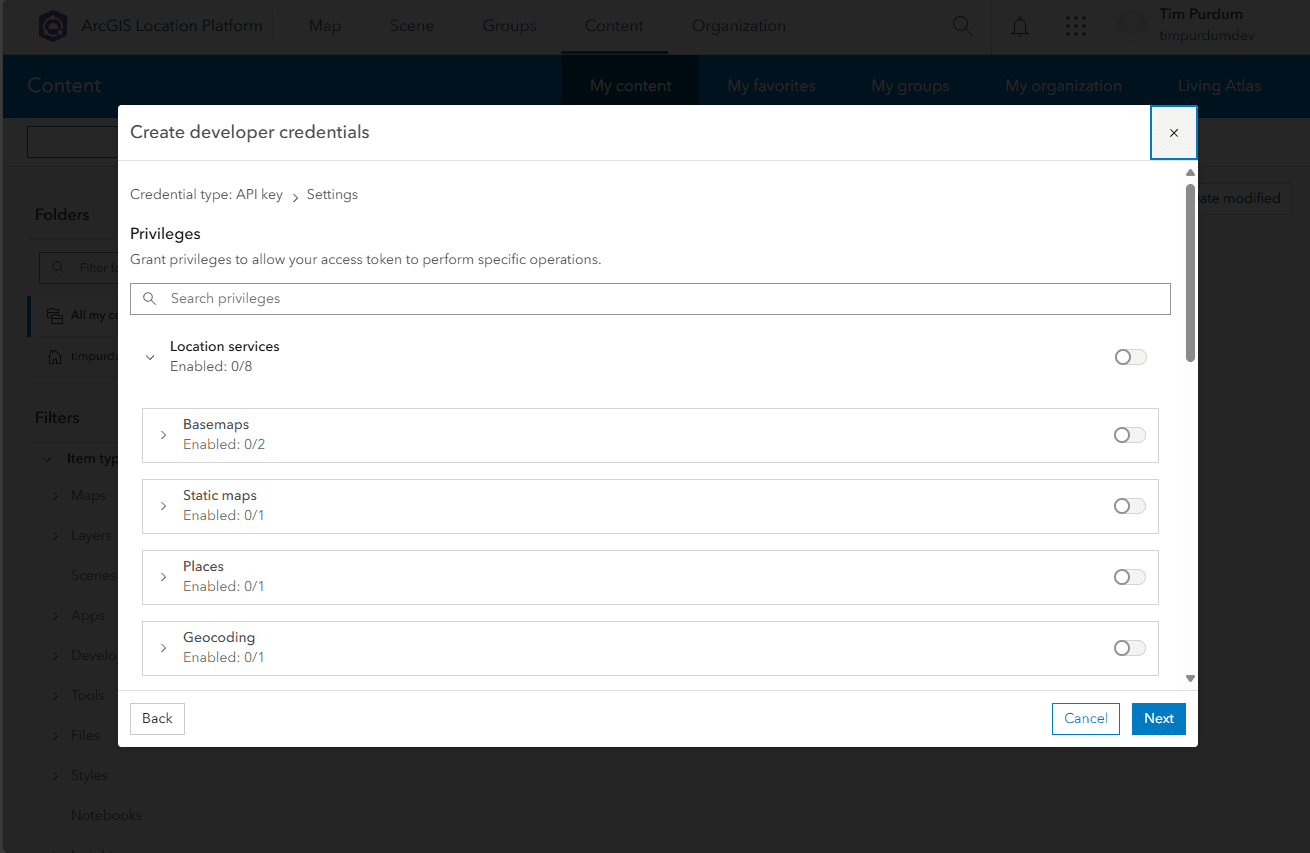
- If you ever create private feature services or other data, you can grant access to those services with your API key here. Select items or choose
Skip.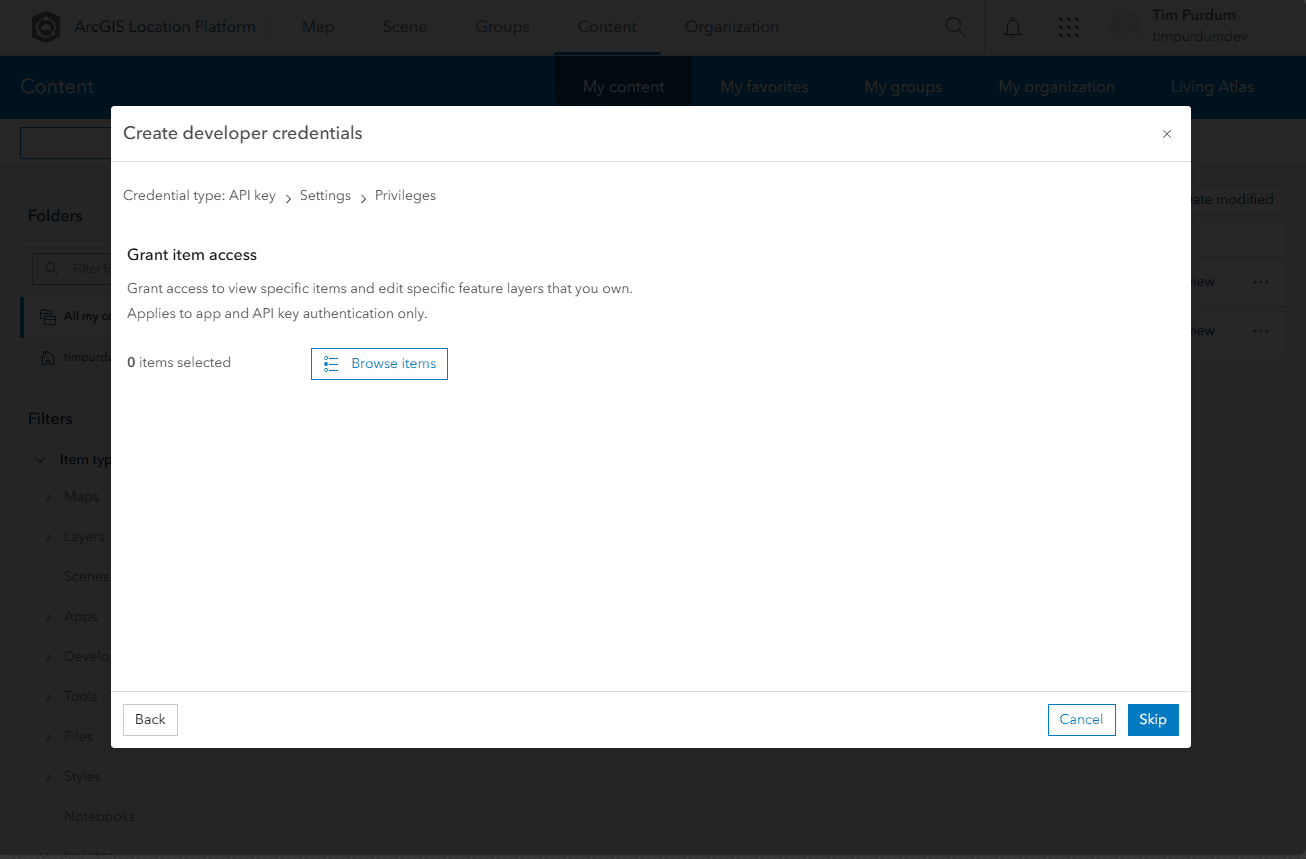
- Give your API key a name, select a folder, category, and tags, and write a summary if you choose. Then click
Next.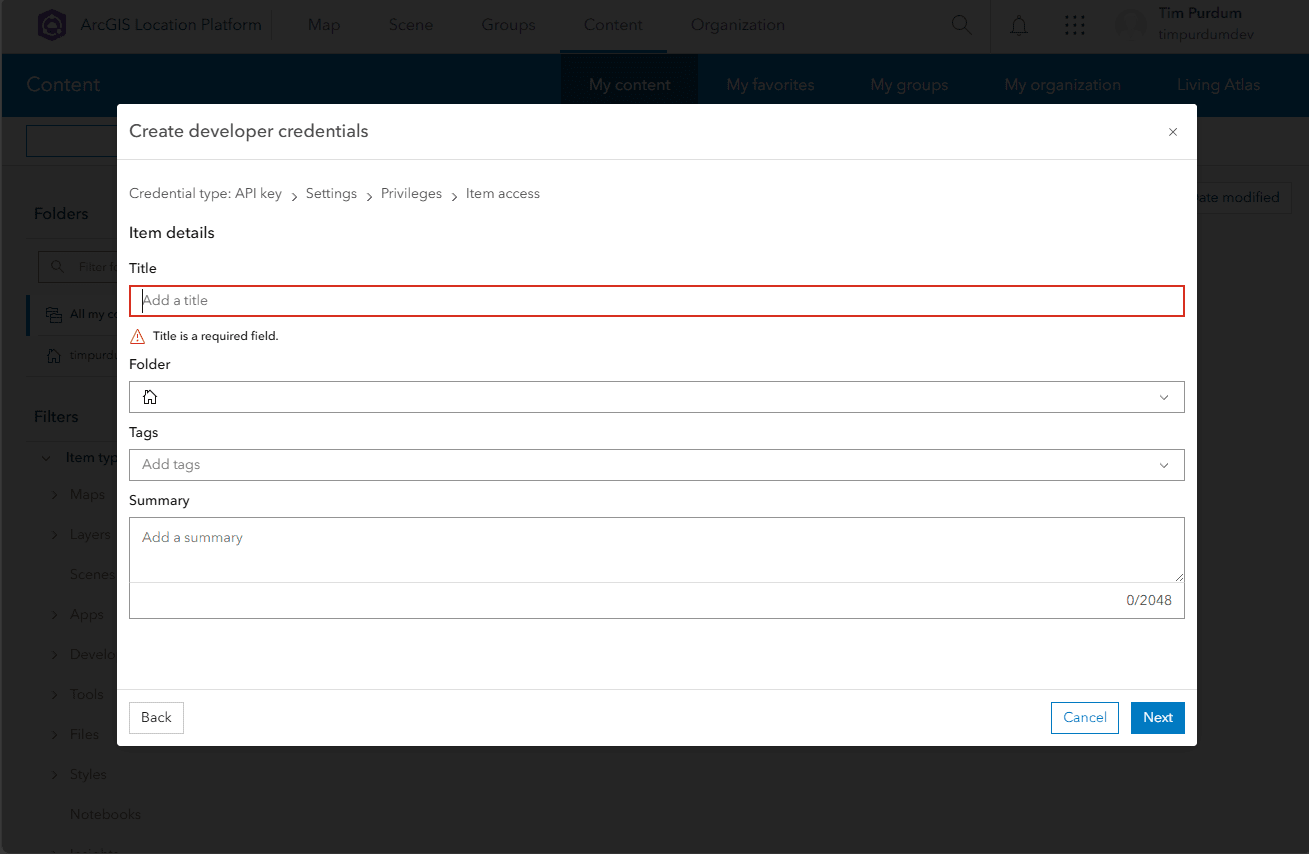
- Review your API key details and click
Next.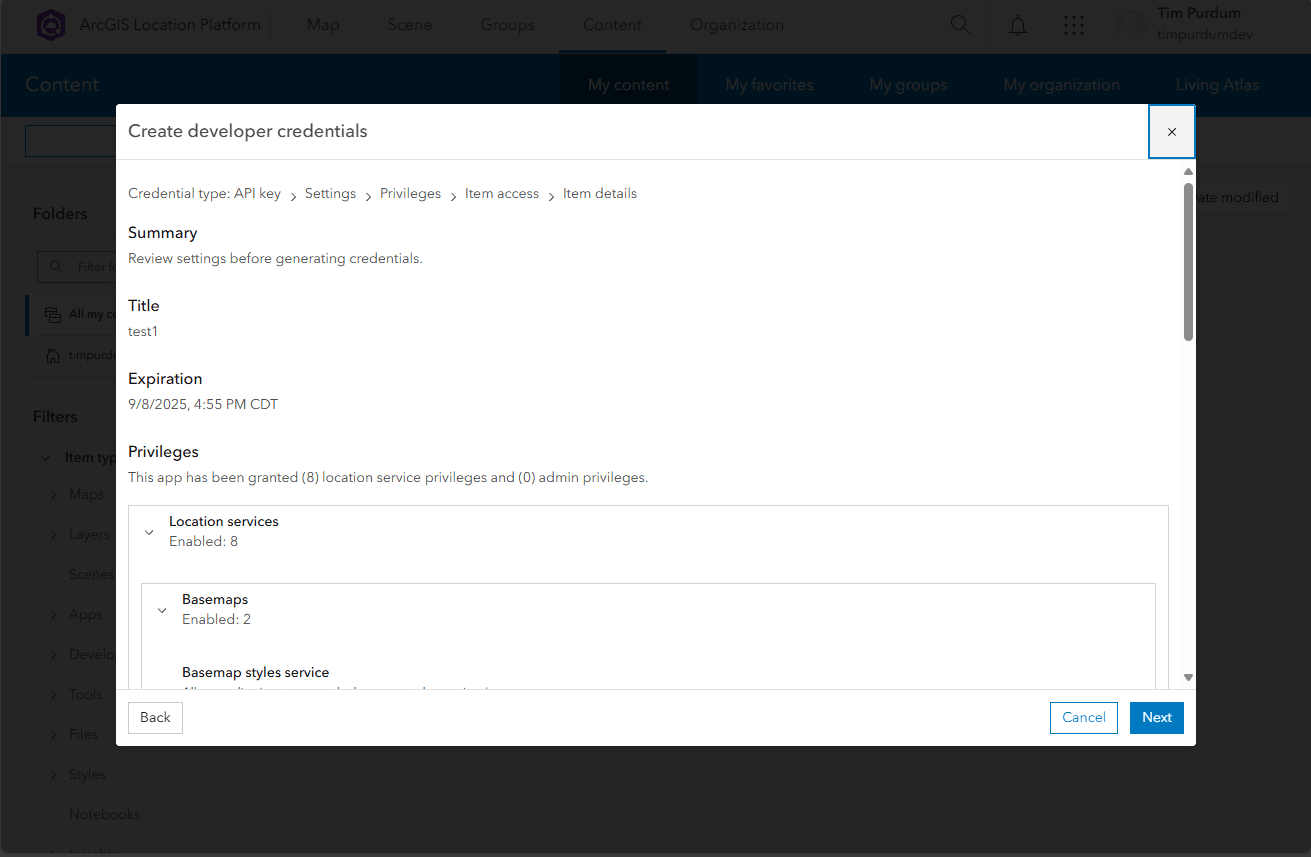
- Be prepared to copy your API key and store it somewhere secure, as you will not be able to see it again. When ready, click
Next.
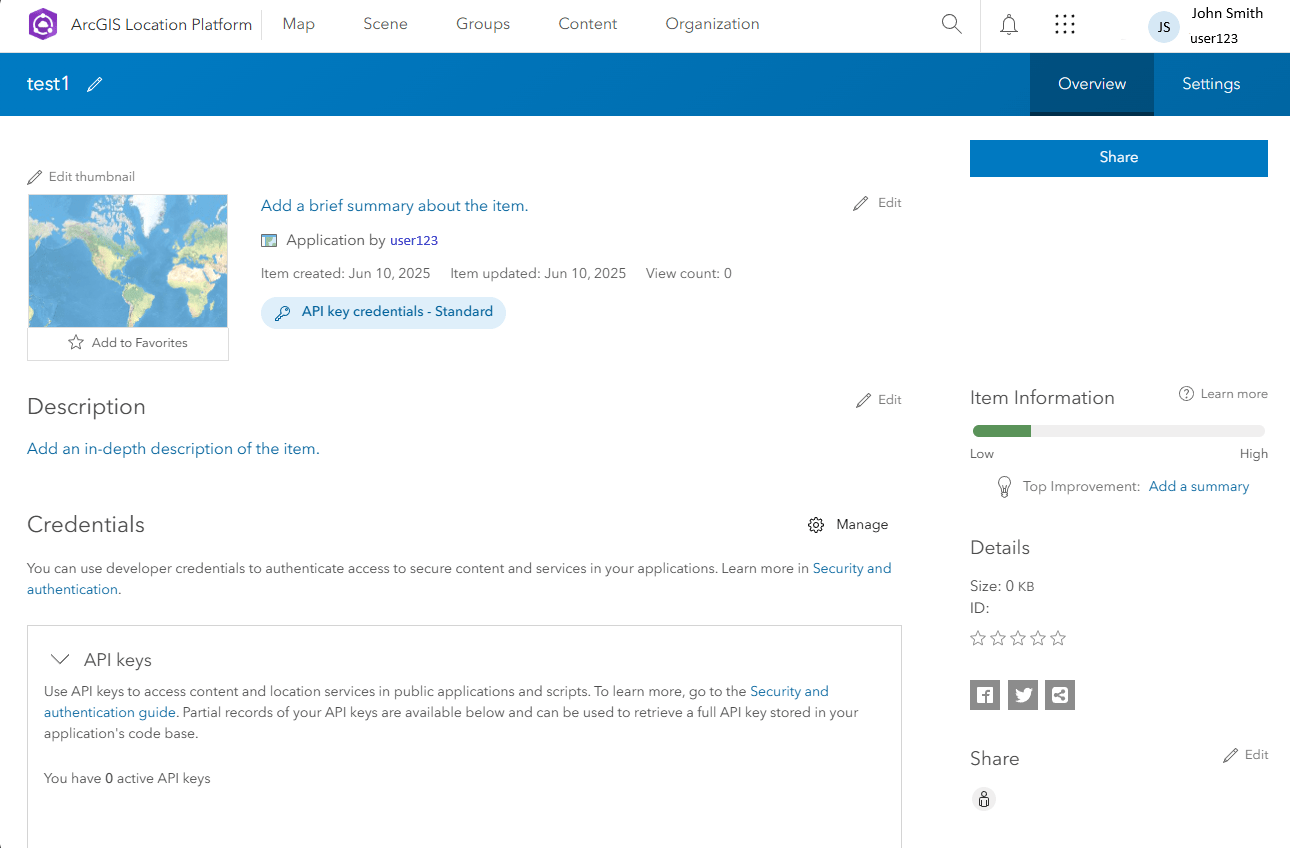
- That’s it! You now have an API key that you can use in your GeoBlazor application. You can also create additional API keys or OAuth applications from the dashboard as needed.
- In your GeoBlazor application, find the JSON file where you stored your GeoBlazor license key, and add a line for the ArcGIS API key.


   {
       "ArcGISApiKey": "your-ArcGIS-api-key",
       "GeoBlazor": {
           "LicenseKey": "your-GeoBlazor-license-key"
       }
   }
If you used the GeoBlazor Templates, you should be ready to run your application at this point! If you are adding GeoBlazor to an existing Blazor application, continue with the steps below to set up your project.
Project Setup
-
Add a
PackageReferenceto the latest version of thedymaptic.GeoBlazor.Coreordymaptic.GeoBlazor.Propackage via your IDE’s Nuget Package Manager or from the command line withdotnet add package dymaptic.GeoBlazor.Core(ordotnet add package dymaptic.GeoBlazor.Pro). For Blazor Web Apps supporting WebAssembly, add this reference to the.ClientWebAssembly project, or a Razor Class Library where you intend to write your mapping Razor components. You don’t need to add it to every project, as long as each project has a dependency on the one with the GeoBlazor reference.Optional: If you need to use bundled assets instead of CDN resources (for offline environments or security requirements), see Asset Files.
-
In the root file that defines your html (
App.razorfor Blazor Web Apps,_Layout.cshtmlfor older Blazor Server apps, andindex.htmlonly for standalone Blazor WebAssembly apps), add the following to the<head>section:<!-- GeoBlazor Core --> <link href="_content/dymaptic.GeoBlazor.Core"/> <link href="YourProject.styles.css" rel="stylesheet" /> <!-- GeoBlazor Pro --> <link href="_content/dymaptic.GeoBlazor.Core" /> <link href="_content/dymaptic.GeoBlazor.Pro" /> <link href="YourProject.styles.css" rel="stylesheet" />The
YourProject.styles.cssis the default stylesheet for your project, this line should already be present in your template, but is important for GeoBlazor to function correctly.Starting in .NET 9, there is also a new static asset compression feature that uses an
Assetsdictionary. If you see this pattern, follow the same pattern for GeoBlazor links:<link href="@Assets["_content/dymaptic.GeoBlazor.Core"]"/> <link href="@Assets["_content/dymaptic.GeoBlazor.Pro"]" /> <link href="@Assets["YourProject.styles.css"]" rel="stylesheet" /> -
In
_Imports.razor(for both Server and Client projects, if applicable), add the following lines so that all of the GeoBlazor components will be available in your Razor files.@using dymaptic.GeoBlazor.Core @using dymaptic.GeoBlazor.Core.Attributes @using dymaptic.GeoBlazor.Core.Components @using dymaptic.GeoBlazor.Core.Components.Geometries @using dymaptic.GeoBlazor.Core.Components.Layers @using dymaptic.GeoBlazor.Core.Components.Popups @using dymaptic.GeoBlazor.Core.Components.Renderers @using dymaptic.GeoBlazor.Core.Components.Symbols @using dymaptic.GeoBlazor.Core.Components.Views @using dymaptic.GeoBlazor.Core.Components.Widgets @using dymaptic.GeoBlazor.Core.Enums @using dymaptic.GeoBlazor.Core.Events @using dymaptic.GeoBlazor.Core.Exceptions @using dymaptic.GeoBlazor.Core.Extensions @using dymaptic.GeoBlazor.Core.Functions @using dymaptic.GeoBlazor.Core.Interfaces @using dymaptic.GeoBlazor.Core.Model @using dymaptic.GeoBlazor.Core.Options @using dymaptic.GeoBlazor.Core.Results @* add below only for GeoBlazor Pro: *@ @using dymaptic.GeoBlazor.Pro @using dymaptic.GeoBlazor.Pro.Components @using dymaptic.GeoBlazor.Pro.Components.Geometries @using dymaptic.GeoBlazor.Pro.Components.Layers @using dymaptic.GeoBlazor.Pro.Components.Popups @using dymaptic.GeoBlazor.Pro.Components.Renderers @using dymaptic.GeoBlazor.Pro.Components.Symbols @using dymaptic.GeoBlazor.Pro.Components.Widgets @using dymaptic.GeoBlazor.Pro.Enums @using dymaptic.GeoBlazor.Pro.Events @using dymaptic.GeoBlazor.Pro.Functions @using dymaptic.GeoBlazor.Pro.Interfaces @using dymaptic.GeoBlazor.Pro.Model @using dymaptic.GeoBlazor.Pro.Options @using dymaptic.GeoBlazor.Pro.Results -
In
Program.cs(for both Server and Client projects, if applicable), add the following line to yourbuilder.Servicesto inject logic components likeGeometryEngine.// GeoBlazor Core builder.Services.AddGeoBlazor(builder.Configuration); // GeoBlazor Pro builder.Services.AddGeoBlazorPro(builder.Configuration); -
GeoBlazor requires Interactive Server or WebAssembly rendering enabled when using the modern
Blazor Web Apptemplates. Verify that the following lines are present in yourProgram.cs. (This is not relevant if you are using the olderBlazor Servertemplate, and does not apply to WebAssembly or .NET MAUI projects).// Server builder.Services.AddRazorComponents() .AddInteractiveServerComponents(); // or WebAssembly builder.Services.AddRazorComponents .AddInteractiveWebAssemblyComponents(); // or both builder.Services.AddRazorComponents() .AddInteractiveServerComponents() .AddInteractiveWebAssemblyComponents();and in the lower portion of the file:
// Server app.MapRazorComponents<App>() .AddInteractiveServerRenderMode(); // or WebAssembly app.MapRazorComponents<App>() .AddInteractiveWebAssemblyRenderMode() .AddAdditionalAssemblies(typeof(Counter).Assembly); // or both app.MapRazorComponents<App>() .AddInteractiveServerRenderMode() .AddInteractiveWebAssemblyRenderMode() .AddAdditionalAssemblies(typeof(Counter).Assembly); -
If you are using Blazor Server or InteractiveServer mode in Blazor Web Apps with the .NET 8
UseStaticFilesmiddleware, you should also add the following lines toProgram.csto support the.wsvfile type. This does not appear to be necessary with the .NET 9MapStaticAssetsmiddleware.var provider = new FileExtensionContentTypeProvider(); provider.Mappings[".wsv"] = "application/octet-stream"; app.UseStaticFiles(new StaticFileOptions { ContentTypeProvider = provider });If you wish to exclude JavaScript
.mapfiles fromUseStaticFiles(useful for debugging, but are a large download for end users), update theprovidercode above to exclude.mapfiles.var provider = new FileExtensionContentTypeProvider(); provider.Mappings[".wsv"] = "application/octet-stream"; #if RELEASE provider.Mappings.Remove(".map"); #endif app.UseStaticFiles(new StaticFileOptions { ContentTypeProvider = provider }); -
Create a Razor Component page with a map. For Blazor Web Apps, be sure that the
@rendermodeis defined at the page or app level (line 2 of the example below). This should beInteractiveServerfor Blazor Server,InteractiveWebAssemblyfor Blazor WebAssembly, orInteractiveAutofor the automatic switching between modes. Learn more about Blazor render modes.@page "/map" @rendermode InteractiveServer <MapView Longitude="-118.805" Latitude="34.027" Zoom="11" Style="height: 400px; width: 100%;"> </MapView> -
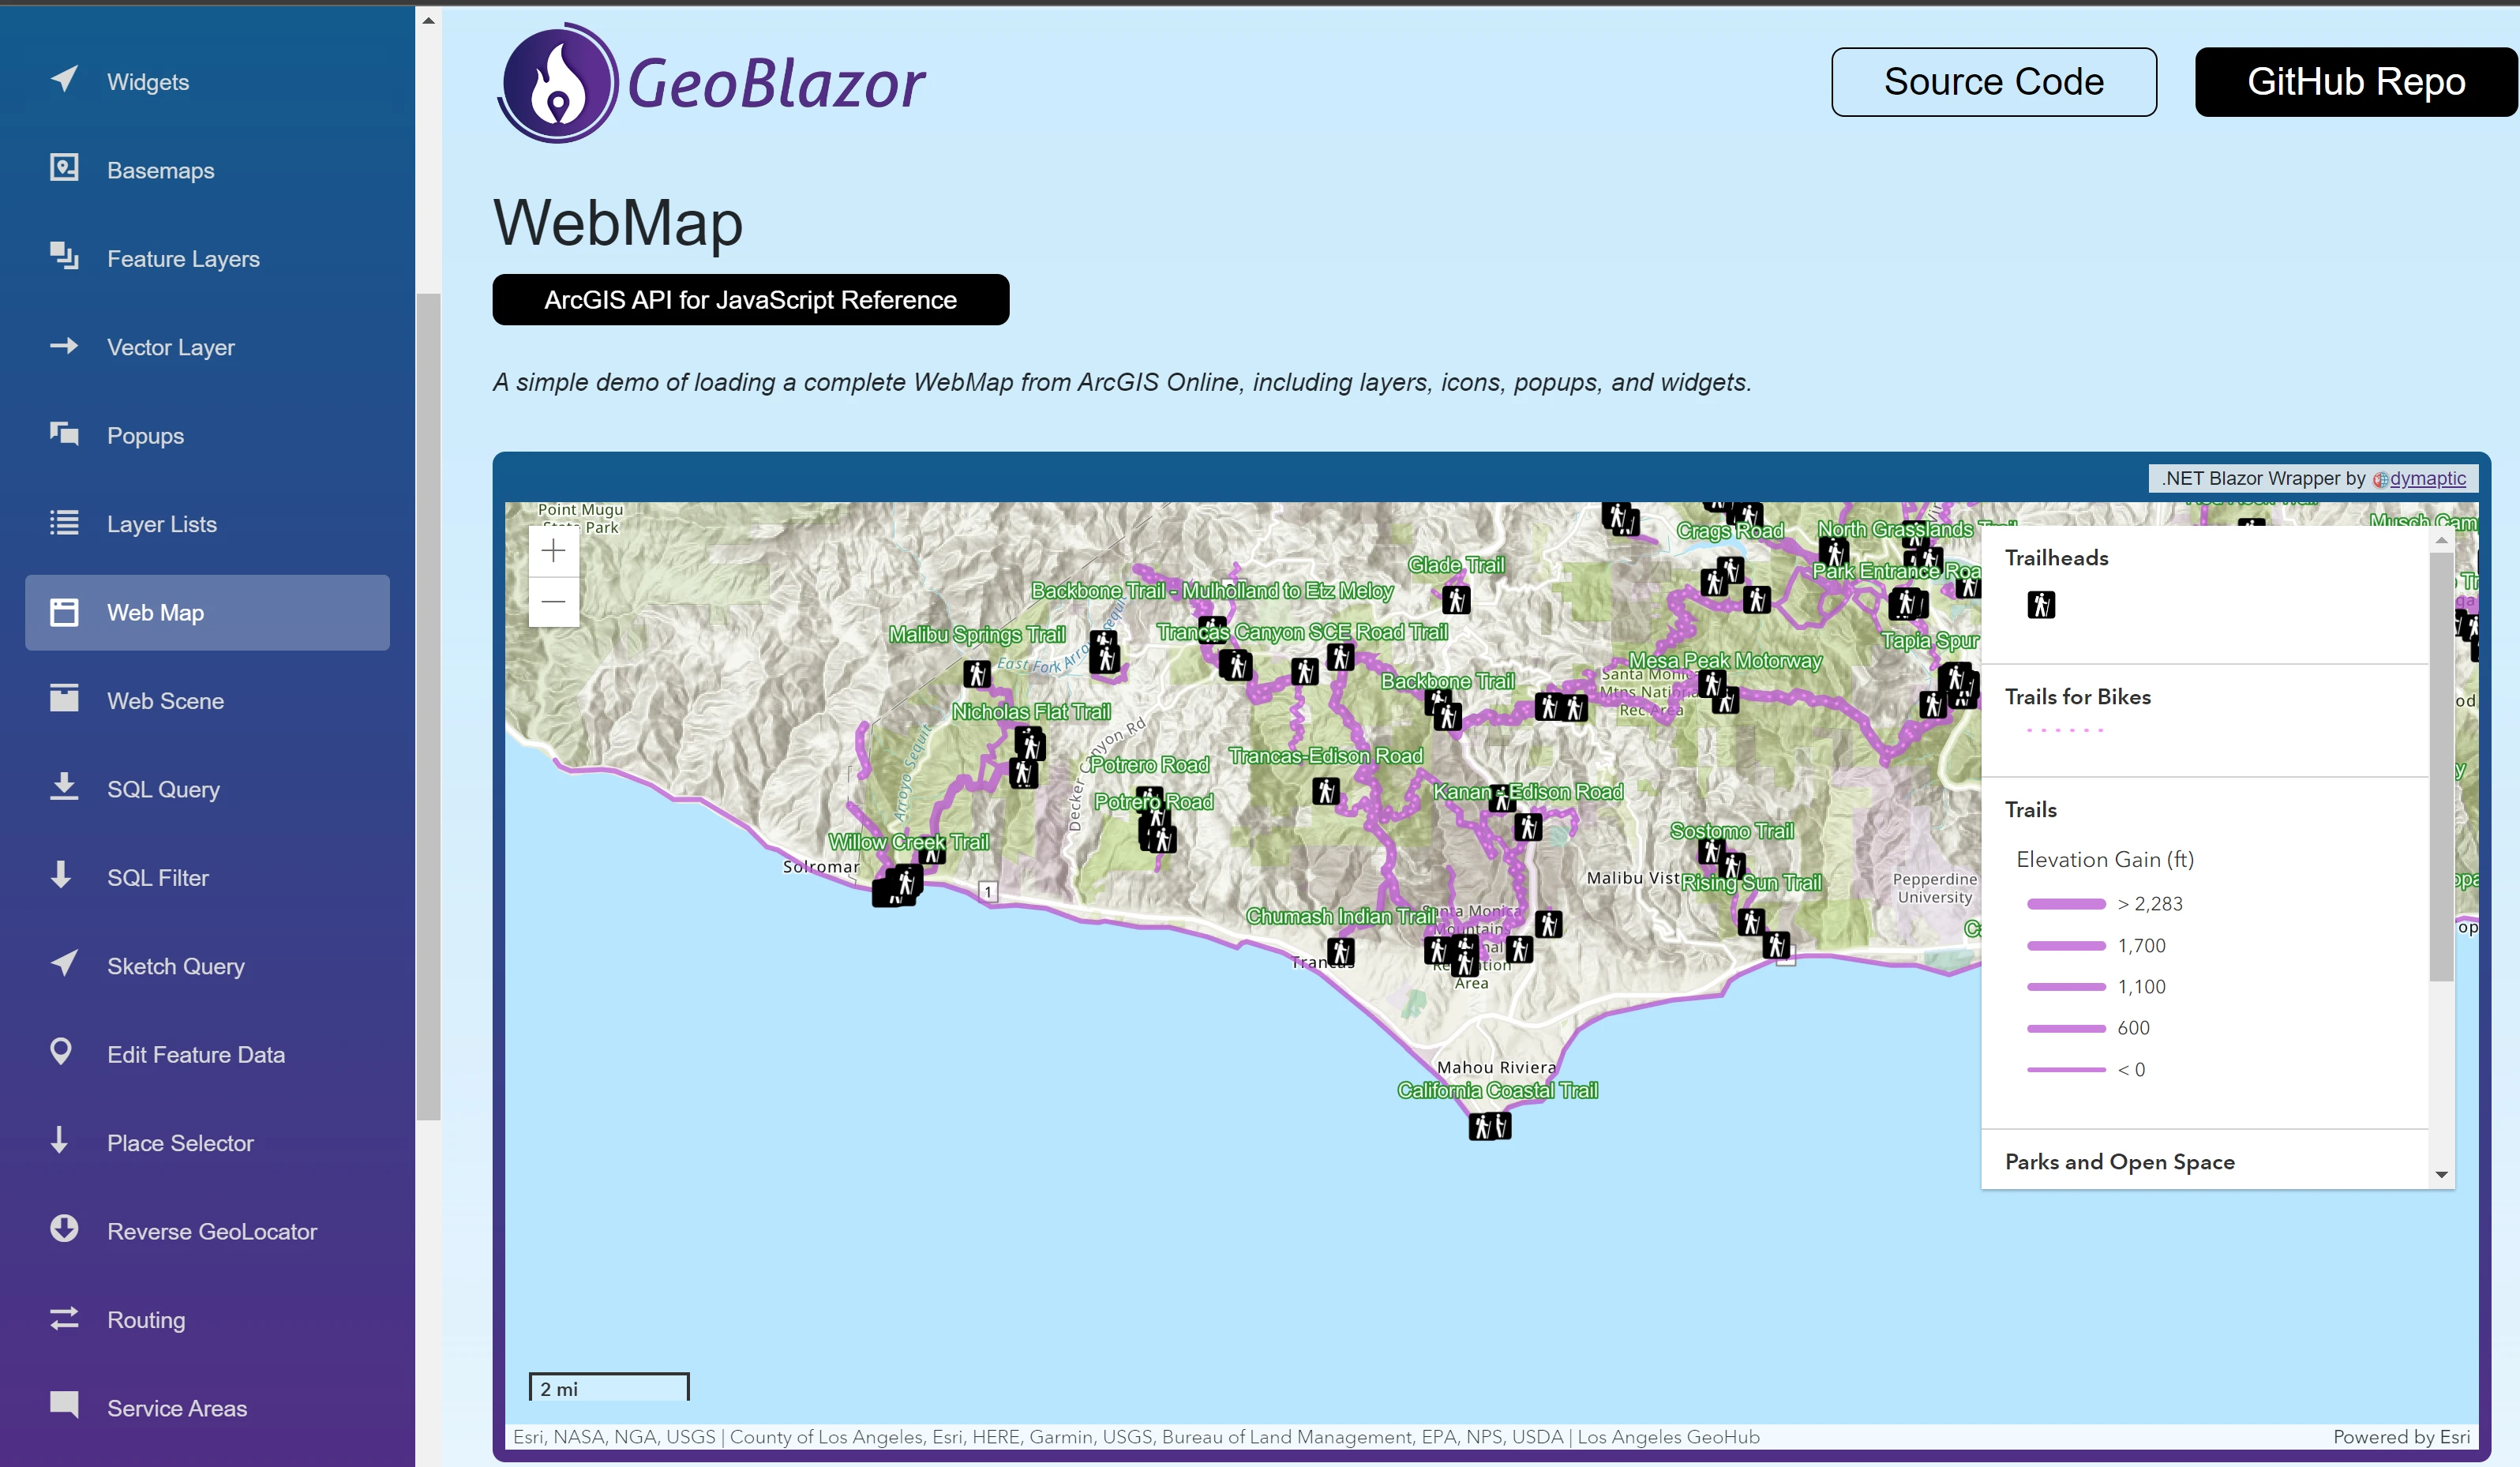
Within the
MapView, define a map using theWebMapcomponent. To load a pre-generated map from ArcGIS Online or Portal, get the Map Id (PortalItem Id) of the map. Note that previous versions of GeoBlazor used the propertyId, but this has been changed toPortalItemIdin GeoBlazor 4 to avoid naming collisions.@page "/map" @rendermode InteractiveServer <MapView Longitude="-118.805" Latitude="34.027" Zoom="11" Style="height: 400px; width: 100%;"> <WebMap> <PortalItem PortalItemId="4a6cb60ebbe3483a805999d481c2daa5" /> </WebMap> </MapView> -
Add a Widget to the
MapView, after theWebMap.@page "/map" @rendermode InteractiveServer <MapView Longitude="-118.805" Latitude="34.027" Zoom="11" Style="height: 400px; width: 100%;"> <WebMap> <PortalItem PortalItemId="4a6cb60ebbe3483a805999d481c2daa5" /> </WebMap> <ScaleBarWidget Position="OverlayPosition.BottomLeft" /> </MapView> -
Run your application and make sure you can see your map! If you have any trouble, join our Discord community for help.